How to Make Homemade Cultured Butter with a Hand Mixer

The scent of fresh, high-fat cream hitting the air is different from the scent of heavy cream. It’s deeper, slightly tangy, and carries a complexity that store-bought butter just can't replicate. Making cultured butter at home using a hand mixer is a way to transform a standard pantry staple into something extraordinary. You'll learn how to turn high-quality cream into a rich, fermented spread that tastes like it came straight from a French farmhouse. It’s a process of patience, temperature control, and the right mechanical action.
Most people think you need a heavy-duty stand mixer or a specialized butter churn to get professional results. That's simply not true. If you have a standard hand mixer and a bit of patience, you can produce a batch of cultured butter that rivals anything you'd find at a high-end grocer. This guide breaks down the science of fermentation and the mechanical steps required to separate fat from buttermilk.
What Is the Difference Between Regular Butter and Cultured Butter?
The primary difference is that cultured butter is made by adding live bacterial cultures to cream before the churning process begins. While standard butter is made by churning cream to separate the fat from the liquid, cultured butter undergoes a fermentation stage first. This stage introduces lactic acid-producing bacteria—the same kind of beneficial bacteria you might encounter when making your own fermented hot sauce—which adds a signature tang and depth of flavor.
In a commercial setting, this is often done with a starter culture. At home, you can use a small amount of high-quality plain yogurt or even a splash of buttermilk to kickstart the process. The result is a product that isn't just salty and fatty, but also bright and complex. It’s the difference between eating a plain piece of bread and eating bread with a real, artisanal spread.
Here is a quick breakdown of the characteristics:
| Feature | Standard Butter | Cultured Butter |
|---|---|---|
| Flavor Profile | Mild, creamy, and neutral | Tangy, acidic, and complex |
| Texture | Smooth and consistent | Often slightly more granular or rich |
| - | - | |
| Best Use | Baking and everyday spreading | Gourmet finishing and crusty breads |
How Much Cream Do I Need to Make Butter?
You generally need about two cups of heavy whipping cream to produce roughly half a cup of butter. The ratio depends heavily on the fat content of your cream; the higher the fat, the more yield you'll get. If you're using a cream with a lower fat percentage, you might end up with more buttermilk and less actual butter.
I always recommend using heavy whipping cream with at least 36% milkfat. Brands like Land O'Lakes or any local organic creamery brand work perfectly. Don't try this with half-and-half—you'll end up frustrated with a bowl full of liquid and no solid fat. You need that high fat content to ensure the fat globules can clump together during the agitation process.
A common mistake is not using enough cream. If you're trying to make a tiny batch, the hand mixer might struggle to create enough friction to build the fat. Aim for at least two cups to ensure the beaters can actually catch the cream and work it effectively.
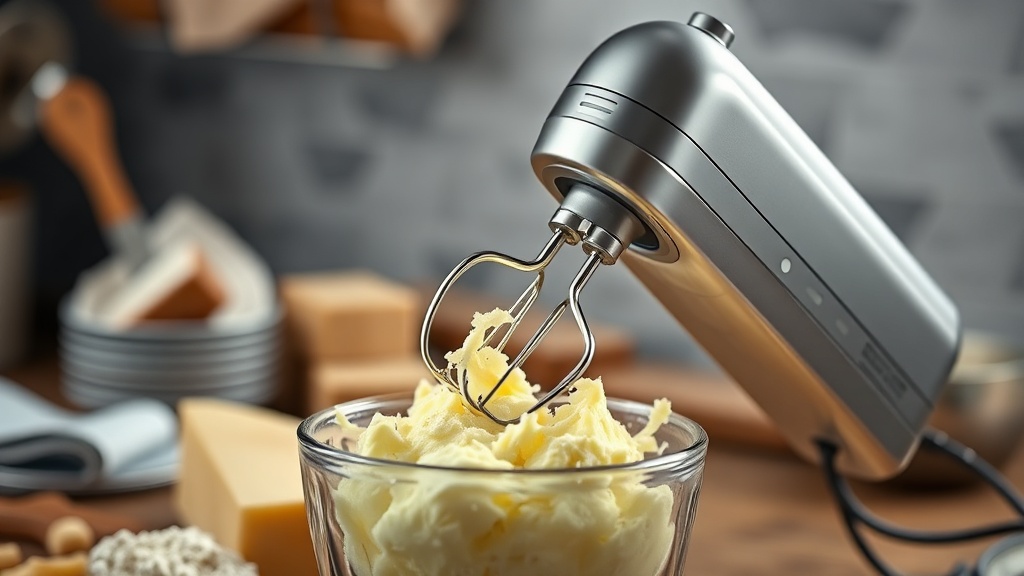
How Do I Use a Hand Mixer to Make Butter?
You start by allowing your cream to reach room temperature, then you introduce your culture and whip it until it reaches the stage of stiff peaks. This is where the mechanical work begins. The hand mixer serves as your primary tool for breaking the fat globules apart and then forcing them back together into a cohesive mass.
Follow these steps for the best results:
- Inoculate the Cream: Pour your heavy cream into a large, chilled glass bowl. Add two tablespoons of plain, unflavored yogurt or buttermilk. Whisk this in gently until combined.
- The Fermentation Phase: Cover the bowl and let it sit at room temperature for 12 to 24 hours. You want the cream to thicken slightly and develop a very subtle tang. (If it smells "off" or sour in a bad way, toss it—but if it smells like yogurt, you're on the right track.)
- The Whipping Stage: Using your hand mixer on medium-high speed, begin whipping the cream. You'll move from liquid to whipped cream, then to a thick, grainy consistency.
- The Breaking Point: Keep mixing. Eventually, the cream will suddenly "break." You'll see yellow clumps of fat separating from a thin, liquid liquid (the buttermilk). This is the moment you've been waiting for.
- The Wash: Drain the buttermilk into a separate jar (save it for pancakes!). Now, place the butter clumps back into the bowl. Use the hand mixer on the lowest setting or use your hands to rinse the butter under cold, running water.
The washing step is where most people fail. You must rinse the butter repeatedly. If any buttermilk remains in the fat, the butter will go rancid within days. I use a fine-mesh strainer and a splash of ice-cold water to squeeze the butter through. Keep rinsing until the water runs completely clear and the butter feels solid and non-acidic.
The catch? If you don't wash it well enough, that "tang" becomes "spoiled." It's a fine line. A little bit of acid is good; a lot of residual liquid is a recipe for mold. Use your senses. If the water is still cloudy, keep rinsing.
Once the butter is clean, add a pinch of high-quality sea salt, like Maldon Salt, to enhance the flavor. Mix it in with the hand mixer one last time. You can now shape it into a disk or a log. Store it in the refrigerator, where it will stay fresh for about two weeks.
It's a bit more work than running to the store, but the texture of home-made cultured butter is unparalleled. It has a certain weight to it that store-bought versions lack. It's a small, tactile way to master a fundamental skill in the kitchen.
Steps
- 1
Prepare the Cream
- 2
Whip the Cream to Soft Peaks
- 3
Beat Until Fat Separates
- 4
Wash the Butter
- 5
Season and Serve